May 19, 2026
Writing Integration Tests in Flutter
Integration testing in Flutter is one of the most powerful tools in a developer's toolkit. In this post, we will explore how to write effective integration tests in Flutter
Author: Norbert Aberor27 views

Testing in Flutter can feel like a lot to take in at first, especially when you encounter terms like unit tests, widget tests, and integration tests all at once. To put it simply, unit tests verify isolated logic, and widget tests check individual components. Both are valuable, but they only tell part of the story. The real magic happens when you bring everything together, and that is exactly where integration testing comes in.
Integration testing in Flutter is one of the most powerful tools in a developer's toolkit. While unit and widget tests focus on individual pieces of your app, integration tests validate how your entire app behaves as a real user would experience it. In this post, we will explore how to write effective integration tests in Flutter, from setting up your test environment to writing expressive, maintainable test cases that give you genuine confidence in your app.
The App We Are Testing
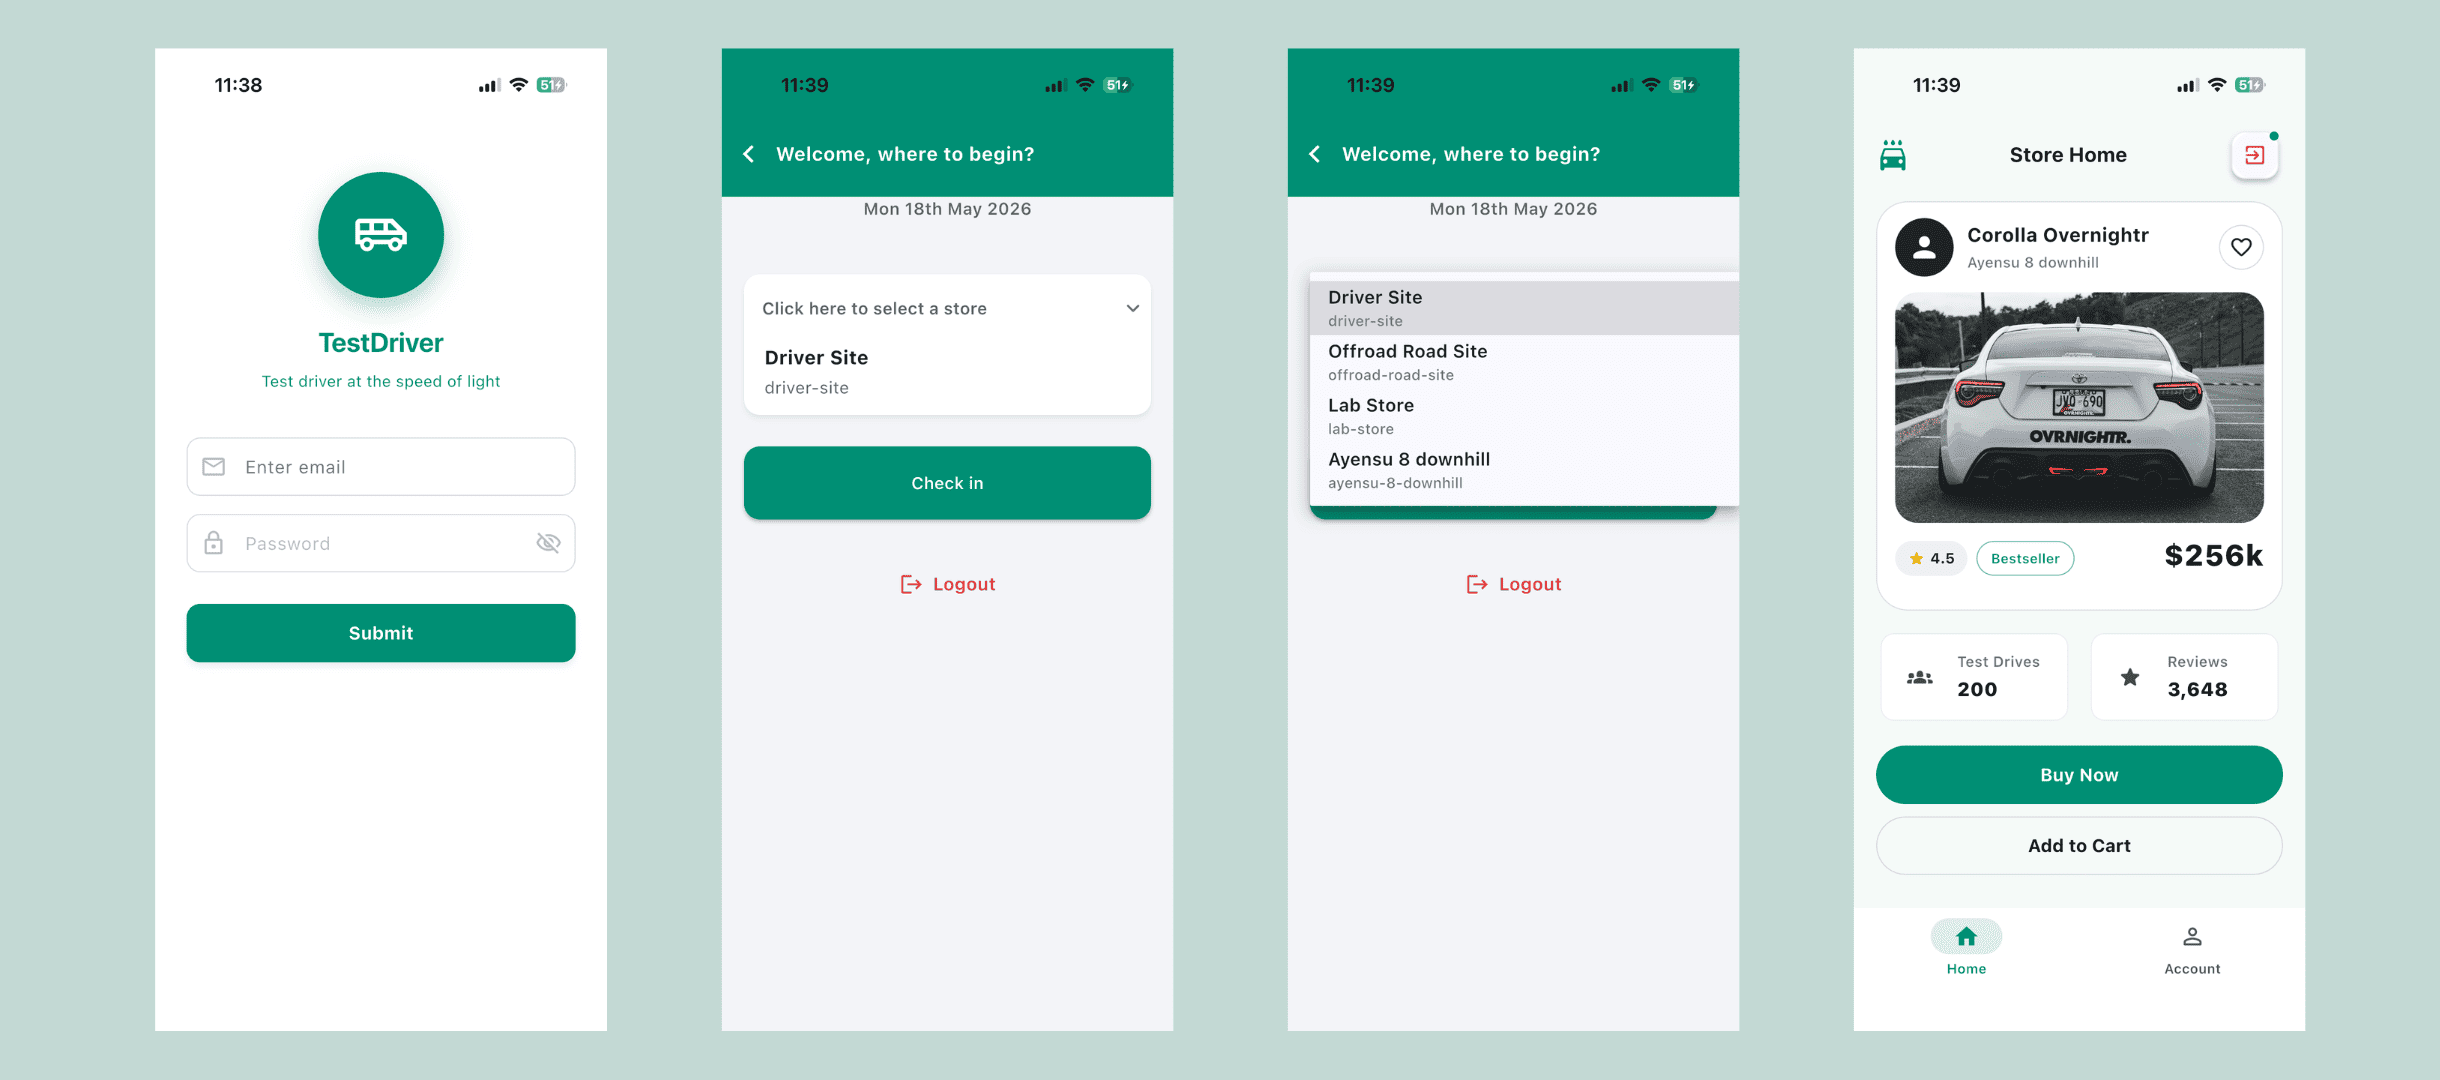
Before we dive into the tests, let us get familiar with the app we will be working with throughout this guide.
The app is a simple retail store check-in tool built for staff. It has three screens. First, a Login Screen, where users enter their email and password to authenticate. Second, a Store Selection Screen, where authenticated users pick their assigned store from a dropdown and check in. Third, a Home Screen, which the user lands on after a successful check-in.
It is a focused, real-world style app, small enough to understand quickly, but complex enough to make testing genuinely meaningful.
A Quick Look at Unit and Widget Tests
Before we get into integration testing, it helps to understand where it sits in the Flutter testing pyramid. Flutter gives you three layers of testing, and each one serves a different purpose.
Setting Up Your Test Folder
Flutter comes with testing support built in, so you do not need to install anything extra for unit and widget tests. When you create a Flutter project, a test/ folder is automatically generated at the root of your project. That is where your unit and widget tests live.
Your folder structure will look something like this:
testflyer/
├── lib/
│   ├── main.dart
│   ├── auth/
│   │   ├── login_helpers.dart
│   │   └── valid_passwords.dart
│   └── screens/
│       ├── login_screen.dart
│       ├── store_selection_screen.dart
│       └── testdrive_home_screen.dart
├── test/
│   ├── unit/
│   │   └── unit_test.dart
│   └── widget/
│       └── widget_test.dart
└── pubspec.yaml
You can organise the test/ folder however you like, but grouping unit and widget tests into their own subfolders keeps things clean as your project grows. Every test file must end in _test.dart for Flutter to recognise and run it.
To run your tests, use:
flutter test
Adding Keys to Your Widgets
Before you can reliably find and interact with widgets in a test, you need to give them keys. A Key is a unique identifier you attach to a widget so that your tests can locate it precisely, even when the widget tree is deep or complex.
Without keys, you are forced to find widgets by their type or displayed text, which is fragile and breaks easily when your UI changes. Keys make your tests stable and expressive.
Here is how you add a key to a widget:
// Without a key, hard to find reliably in tests
TextFormField(
  decoration: InputDecoration(labelText: 'Email'),
)

// With a key, easy to find in any test
TextFormField(
  key: const ValueKey('email_field'),
  decoration: InputDecoration(labelText: 'Email'),
)
For our app, the login screen widgets are keyed like this:
TextFormField(
  key: const ValueKey('email_field'),
  decoration: InputDecoration(labelText: 'Email'),
),
TextFormField(
  key: const ValueKey('password_field'),
  obscureText: true,
  decoration: InputDecoration(labelText: 'Password'),
),
ElevatedButton(
  key: const ValueKey('submit_button'),
  onPressed: handleLogin,
  child: Text('Login'),
),
// A loading indicator shown while authentication is in progress
CircularProgressIndicator(
  key: ValueKey('login_loader'),
),
And on the Store Selection Screen:
Text(
  'Welcome',
  key: const ValueKey('welcome_header'),
),
Text(
  formattedDate,
  key: const ValueKey('current_date_display'),
),
DropdownButton<StoreRecord>(
  key: const ValueKey('store_dropdown_selector'),
  // ...
),
ElevatedButton(
  key: const ValueKey('checkin_action_button'),
  onPressed: handleCheckin,
  child: Text('Check In'),
),
ElevatedButton(
  key: const ValueKey('logout_action_button'),
  onPressed: handleLogout,
  child: Text('Logout'),
),
And on the Home Screen, the bottom navigation items and sign out button are also keyed so tests can verify the user landed in the right place:
BottomNavigationBarItem(
  key: const ValueKey('home_nav_home'),
  // ...
),
BottomNavigationBarItem(
  key: const ValueKey('home_nav_account'),
  // ...
),
ElevatedButton(
  key: const ValueKey('home_sign_out_button'),
  onPressed: handleSignOut,
  child: Text('Sign Out'),
),
A good rule of thumb is to add keys to any widget you know your tests will need to interact with or verify. You do not need to key every single widget in your app, only the meaningful, interactive, or landmark ones.
Understanding the Structure of a Test File
Whether you are writing unit or widget tests, every Flutter test file follows the same structure. Understanding this structure makes it much easier to read and write tests confidently.
Here is a breakdown of the key sections:
// 1. Imports
// Bring in Flutter testing tools and any files your test needs.
import 'package:flutter_test/flutter_test.dart';
import 'package:testflyer/screens/login_screen.dart';

// 2. main() function
// All tests live inside main(). Flutter's test runner looks for this entry point.
void main() {

  // 3. group()
  // Groups related tests together under a label. This keeps output readable
  // and makes it clear which feature or screen a set of tests belongs to.
  group('Login Screen', () {

    // 4. setUp() (optional)
    // Runs before every test in the group. Use it to initialise
    // anything your tests share, like controllers or mock data.
    setUp(() {
      // initialise shared resources here
    });

    // 5. test() or testWidgets()
    // An individual test case. Use test() for unit tests
    // and testWidgets() for widget tests.
    testWidgets('renders email and password fields', (tester) async {

      // Arrange. Set up the widget or state you are testing.
      await tester.pumpWidget(const MaterialApp(home: LoginScreen()));

      // Act. Perform any interactions if needed.
      // (Nothing to do here, we are just checking what is rendered.)

      // Assert. Verify the expected outcome.
      expect(find.byKey(const ValueKey('email_field')), findsOneWidget);
      expect(find.byKey(const ValueKey('password_field')), findsOneWidget);
    });

    // 6. tearDown() (optional)
    // Runs after every test in the group. Use it to clean up
    // anything that should not carry over between tests.
    tearDown(() {
      // clean up resources here
    });

  });
}
The Arrange, Act, Assert pattern you see in the comments is a widely used convention for structuring the body of each test. Arrange sets up what you need, Act performs the action being tested, and Assert checks that the result is what you expected. You do not have to write these as comments in your own tests, but keeping this mental model in mind will help you write cleaner, more intentional tests.
Unit Tests
Unit tests are the most granular layer. They test a single function, method, or class in complete isolation, no UI, no navigation, no dependencies. Think of them as a way to verify that your logic does exactly what you expect.
Our app has two helper functions in lib/auth/login_helpers.dart that are great candidates for unit testing. isAcceptedDemoLoginPassword checks whether a password is on the allow-list, and displayNameFromEmail extracts and capitalises the username from an email address. Here is what their unit tests look like:
// test/unit/unit_test.dart
import 'package:flutter_test/flutter_test.dart';
import 'package:testflyer/auth/login_helpers.dart';

void main() {
  group('isAcceptedDemoLoginPassword', () {
    test('returns true for every allow-listed password', () {
      expect(isAcceptedDemoLoginPassword('demo123'), isTrue);
      expect(isAcceptedDemoLoginPassword('PreparePrevent'), isTrue);
      expect(isAcceptedDemoLoginPassword('@Password123'), isTrue);
    });

    test('returns false for wrong or empty passwords', () {
      expect(isAcceptedDemoLoginPassword('wrong'), isFalse);
      expect(isAcceptedDemoLoginPassword(''), isFalse);
    });

    test('does not trim, must match list entry exactly', () {
      expect(isAcceptedDemoLoginPassword(' demo123'), isFalse);
      expect(isAcceptedDemoLoginPassword('demo123 '), isFalse);
    });
  });

  group('displayNameFromEmail', () {
    test('capitalizes local part before @', () {
      expect(displayNameFromEmail('norbert@example.com'), 'Norbert');
    });

    test('handles leading and trailing whitespace on email', () {
      expect(displayNameFromEmail('  amy@shop.test '), 'Amy');
    });

    test('returns User when local part is empty', () {
      expect(displayNameFromEmail('@only.domain'), 'User');
      expect(displayNameFromEmail(''), 'User');
    });
  });
}
Clean, fast, and focused. Unit tests do not care about buttons or screens. They only care about whether your logic is correct.
Widget Tests
Widget tests step up one level. They render a single widget in a test environment and let you interact with it, without running the full app. They are ideal for verifying that a widget looks right, responds to input correctly, and displays the expected output.
Our widget test boots the full MyApp widget, walks through the login form, and verifies that the Store Selection Screen appears with all its expected elements. It stops short of full check-in, which is where integration tests take over.
// test/widget/widget_test.dart
import 'package:flutter/material.dart';
import 'package:flutter_test/flutter_test.dart';
import 'package:testflyer/main.dart';

void main() {
  testWidgets('auth flow reaches store selection screen', (
    WidgetTester tester,
  ) async {
    // Arrange
    await tester.pumpWidget(const MyApp());

    expect(find.byKey(const ValueKey('email_field')), findsOneWidget);
    expect(find.byKey(const ValueKey('password_field')), findsOneWidget);

    // Act
    await tester.enterText(
      find.byKey(const ValueKey('email_field')),
      'norbert@example.com',
    );
    await tester.enterText(
      find.byKey(const ValueKey('password_field')),
      'demo123',
    );
    await tester.tap(find.byKey(const ValueKey('submit_button')));
    await tester.pump();

    // Assert the loading indicator appears while auth is processing
    expect(find.byKey(const ValueKey('login_loader')), findsOneWidget);

    await tester.pump(const Duration(milliseconds: 800));

    // Assert we have landed on the Store Selection Screen
    expect(find.byKey(const ValueKey('welcome_header')), findsOneWidget);
    expect(find.byKey(const ValueKey('current_date_display')), findsOneWidget);
    expect(find.byKey(const ValueKey('store_dropdown_selector')), findsOneWidget);
    expect(find.byKey(const ValueKey('checkin_action_button')), findsOneWidget);
    expect(find.byKey(const ValueKey('logout_action_button')), findsOneWidget);
  });
}
Widget tests are faster than integration tests and do not require a device or emulator, but they stop at the boundaries of the widget environment. They cannot fully replicate the platform-level behaviour that happens during a real check-in on a live device, which is exactly why integration tests exist.
So Where Does Integration Testing Fit?
Here is a simple way to think about all three layers together:
| Test Type | What It Tests | Needs a Device |
|---|---|---|
| Unit | Logic and functions | No |
| Widget | Individual UI components | No |
| Integration | The full app, screen to screen | Yes |
Unit and widget tests are great for catching bugs early and testing edge cases in isolation. But neither of them can tell you whether a user can actually log in, pick a store from the dropdown, and land on the home screen successfully. That is the job of integration tests, and that is exactly what the rest of this guide is about.
Integration Testing in Flutter
Now that we have a solid understanding of unit and widget tests, it is time to look at the main event. Integration tests validate your entire app as a whole, running on a real device or emulator, simulating exactly what a real user would do from the moment they open the app.
Dependencies and Setup
Unlike unit and widget tests, integration testing requires an additional package. The good news is that for Flutter projects, integration_test is an SDK package, so you do not need to find it on pub.dev. Add the following to your pubspec.yaml under dev_dependencies:
dev_dependencies:
  flutter_test:
    sdk: flutter
  integration_test:
    sdk: flutter
In our app's pubspec.yaml, this is already in place. Run the following to make sure all dependencies are fetched:
flutter pub get
Where Do Integration Tests Live?
Integration tests do not go in the test/ folder. They get their own dedicated folder at the root of your project, called integration_test/. This separation is intentional. Integration tests run differently from unit and widget tests, and Flutter needs them in a specific location to handle them correctly.
Your updated folder structure will look like this:
testflyer/
├── lib/
│   ├── main.dart
│   ├── auth/
│   │   ├── login_helpers.dart
│   │   └── valid_passwords.dart
│   └── screens/
│       ├── login_screen.dart
│       ├── store_selection_screen.dart
│       └── testdrive_home_screen.dart
├── test/
│   ├── unit/
│   │   └── unit_test.dart
│   └── widget/
│       └── widget_test.dart
├── integration_test/
│   └── login_test.dart
└── pubspec.yaml
Your integration test files still follow the _test.dart naming convention, and they still use main() as the entry point, but there are a few important differences in how they are structured, which we will look at next.
Structure of an Integration Test File
Integration test files follow the same general structure as unit and widget tests, with two important additions.
// 1. Imports
// You need integration_test in addition to flutter_test.
// You also import your app's main.dart to boot the full app.
import 'package:flutter/material.dart';
import 'package:flutter_test/flutter_test.dart';
import 'package:integration_test/integration_test.dart';
import 'package:testflyer/main.dart' as app;

void main() {

  // 2. Binding initialisation
  // This is unique to integration tests. It must be the very first
  // line inside main(). It connects Flutter's test framework to the
  // integration test runner so the two can communicate during the test.
  IntegrationTestWidgetsFlutterBinding.ensureInitialized();

  group('App Login', () {

    testWidgets('description of what this test covers', (tester) async {

      // 3. Boot the full app
      // Instead of pumpWidget() with a single screen, you call app.main()
      // to start the entire application, just like a real user would.
      app.main();
      await tester.pumpAndSettle();

      // Arrange, Act, Assert from here, just like widget tests.
    });

  });
}
The two key differences from unit and widget tests are:
IntegrationTestWidgetsFlutterBinding.ensureInitialized()must be called before anything else. It wires up the integration test runner with Flutter's rendering engine.- You boot the full app with
app.main()instead of rendering a single widget. This means every screen, every navigation route, and every service your app uses is live during the test.
Understanding pumpAndSettle and pump
Before writing the tests, it is worth understanding two methods you will use constantly in integration testing.
pumpAndSettle() tells the tester to keep rebuilding frames until there is nothing left animating or loading. It is the method you reach for after actions that trigger navigation, animations, or async operations, because it waits for the UI to fully settle before moving on.
pump(Duration) triggers a single frame rebuild after a fixed amount of time. You use this when you know roughly how long an operation takes but pumpAndSettle() alone might time out waiting. In our login test, for example, we use pump(Duration(milliseconds: 900)) after tapping the submit button to give the authentication a moment to complete before asserting the result.
A good pattern to follow is to call pump(Duration(...)) for known async waits, then follow it immediately with pumpAndSettle() to make sure the UI has fully caught up:
await tester.tap(find.byKey(const ValueKey('submit_button')));
await tester.pump(const Duration(milliseconds: 900));
await tester.pumpAndSettle();
Writing the Tests
Now let us walk through the two integration tests for our app.
Test 1. Login with Valid Credentials
This test boots the app, fills in the login form, submits it, and verifies that the Store Selection Screen appears by checking for both the welcome_header and the store_dropdown_selector keys.
testWidgets('should login with valid credentials (keys)', (tester) async {
  // Boot the full app
  app.main();
  await tester.pumpAndSettle();

  // Find our keyed widgets
  final emailField = find.byKey(const ValueKey('email_field'));
  final passwordField = find.byKey(const ValueKey('password_field'));
  final submitButton = find.byKey(const ValueKey('submit_button'));

  // Tap the email field and enter credentials
  await tester.tap(emailField);
  await tester.pumpAndSettle();
  await tester.enterText(emailField, 'vroom@drivers_inc.com');
  await tester.pumpAndSettle();

  // Tap the password field and enter the password
  await tester.tap(passwordField);
  await tester.pumpAndSettle();
  await tester.enterText(passwordField, '@Password123');
  await tester.pumpAndSettle();

  // Tap somewhere neutral to dismiss the keyboard before submitting
  await tester.tapAt(const Offset(10, 10));
  await tester.pumpAndSettle();

  // Submit the form
  await tester.tap(submitButton);
  await tester.pump(const Duration(milliseconds: 900));
  await tester.pumpAndSettle();

  // Assert that we have landed on the Store Selection Screen
  expect(find.byKey(const ValueKey('welcome_header')), findsOneWidget);
  expect(find.byKey(const ValueKey('store_dropdown_selector')), findsOneWidget);
});
A few things worth noting here:
- We tap the field before entering text. This ensures the field has focus, which mirrors what a real user would do and avoids edge cases where the keyboard or field state is not ready.
- We call
tapAt(Offset(10, 10))before submitting. This taps a neutral corner of the screen to dismiss the soft keyboard. On some devices, an open keyboard can obscure the submit button and cause the tap to fail. - We assert both the
welcome_headerand thestore_dropdown_selectorat the end. Asserting two landmarks from the same screen gives you stronger confidence that the navigation completed correctly, not just that one widget happened to appear. - Each action is followed by
pumpAndSettle()to give the UI time to respond before the next step.
Test 2. Store Selection and Check-in
Each integration test starts fresh with a new app instance. That means this test has to log in again before it can test the store selection flow. This is intentional and expected in integration testing.
testWidgets('should select Driver Site and reach home after check-in',
    (tester) async {
  // Boot the app and log in first
  app.main();
  await tester.pumpAndSettle();

  await tester.enterText(
    find.byKey(const ValueKey('email_field')),
    'vroom@drivers_inc.com',
  );
  await tester.enterText(
    find.byKey(const ValueKey('password_field')),
    '@Password123',
  );
  await tester.pumpAndSettle();

  await tester.tap(find.byKey(const ValueKey('submit_button')));
  await tester.pump(const Duration(milliseconds: 900));
  await tester.pumpAndSettle();

  // Confirm we are on the Store Selection Screen
  expect(find.byKey(const ValueKey('store_dropdown_selector')), findsOneWidget);

  // Open the dropdown and select a store
  await tester.tap(find.byKey(const ValueKey('store_dropdown_selector')));
  await tester.pumpAndSettle();

  // The store code is the unique identifier displayed in the dropdown menu
  await tester.tap(find.text('driver-site').last);
  await tester.pumpAndSettle();

  // Tap the check-in button
  await tester.tap(find.byKey(const ValueKey('checkin_action_button')));
  await tester.pumpAndSettle();

  // Assert that the home screen rendered with the correct store
  expect(find.byKey(const ValueKey('home_nav_home')), findsOneWidget);
  expect(find.byKey(const ValueKey('home_nav_account')), findsOneWidget);
  expect(find.textContaining('Driver Site'), findsWidgets);
});
A couple of things to note in this test:
- We use
find.text('driver-site').lastwhen selecting the dropdown item. When a dropdown opens in Flutter, the selected value can appear twice in the widget tree, once in the closed dropdown and once in the open menu. Using.lastreliably targets the menu item rather than the label. - We assert the home screen using both navigation bar keys and a text content check. The
home_nav_homeandhome_nav_accountkeys confirm we are on the right screen, andfind.textContaining('Driver Site')confirms the correct store carried through to the home view.
Running Integration Tests
Integration tests require a connected device or a running emulator because they run the full app. To run a specific integration test file, use:
flutter test integration_test/login_test.dart
To run all integration tests in the folder at once:
flutter test integration_test/
If you want to target a specific device when you have multiple connected, use the -d flag:
flutter test integration_test/login_test.dart -d emulator-5554
A Note on Test Isolation
You may have noticed that the second test repeats the login steps from the first. This is not an oversight. Each integration test should be fully self-contained, able to run independently without relying on the state left behind by another test. This principle is called test isolation, and it is one of the most important habits to build as you write more tests.
If your tests depend on each other to run in a specific order, a single failure early in the sequence will cause every test after it to fail too, even if those tests themselves are perfectly correct. Writing each test to set up its own state from scratch keeps your test suite reliable and your results trustworthy.
Putting It All Together
Here is a final look at the complete integration test file for our app:
// integration_test/login_test.dart
import 'package:flutter/material.dart';
import 'package:flutter_test/flutter_test.dart';
import 'package:integration_test/integration_test.dart';
import 'package:testflyer/main.dart' as app;

void main() {
  IntegrationTestWidgetsFlutterBinding.ensureInitialized();

  group('App Login', () {

    testWidgets('should login with valid credentials (keys)', (tester) async {
      app.main();
      await tester.pumpAndSettle();

      final emailField = find.byKey(const ValueKey('email_field'));
      final passwordField = find.byKey(const ValueKey('password_field'));
      final submitButton = find.byKey(const ValueKey('submit_button'));

      await tester.tap(emailField);
      await tester.pumpAndSettle();
      await tester.enterText(emailField, 'vroom@drivers_inc.com');
      await tester.pumpAndSettle();

      await tester.tap(passwordField);
      await tester.pumpAndSettle();
      await tester.enterText(passwordField, '@Password123');
      await tester.pumpAndSettle();

      await tester.tapAt(const Offset(10, 10));
      await tester.pumpAndSettle();

      await tester.tap(submitButton);
      await tester.pump(const Duration(milliseconds: 900));
      await tester.pumpAndSettle();

      expect(find.byKey(const ValueKey('welcome_header')), findsOneWidget);
      expect(find.byKey(const ValueKey('store_dropdown_selector')), findsOneWidget);
    });

    testWidgets(
      'should select Driver Site and reach home after check-in',
      (tester) async {
        app.main();
        await tester.pumpAndSettle();

        await tester.enterText(
          find.byKey(const ValueKey('email_field')),
          'vroom@drivers_inc.com',
        );
        await tester.enterText(
          find.byKey(const ValueKey('password_field')),
          '@Password123',
        );
        await tester.pumpAndSettle();

        await tester.tap(find.byKey(const ValueKey('submit_button')));
        await tester.pump(const Duration(milliseconds: 900));
        await tester.pumpAndSettle();

        expect(find.byKey(const ValueKey('store_dropdown_selector')), findsOneWidget);

        await tester.tap(find.byKey(const ValueKey('store_dropdown_selector')));
        await tester.pumpAndSettle();

        await tester.tap(find.text('driver-site').last);
        await tester.pumpAndSettle();

        await tester.tap(find.byKey(const ValueKey('checkin_action_button')));
        await tester.pumpAndSettle();

        expect(find.byKey(const ValueKey('home_nav_home')), findsOneWidget);
        expect(find.byKey(const ValueKey('home_nav_account')), findsOneWidget);
        expect(find.textContaining('Driver Site'), findsWidgets);
      },
    );

  });
}
Final Thoughts
Integration testing is one of the most valuable investments you can make in a Flutter project. It will not replace your unit or widget tests, but it fills the gap they cannot cover, verifying that your app works as a complete, connected experience.
Start with the flows that matter most. For our app, login and store check-in are the two most critical paths because without them, nothing else in the app is reachable. Write those integration tests first, keep them isolated, and build from there as your app grows.
You can find the code for the app 🔗 In My GithubRepo
Happy testing.